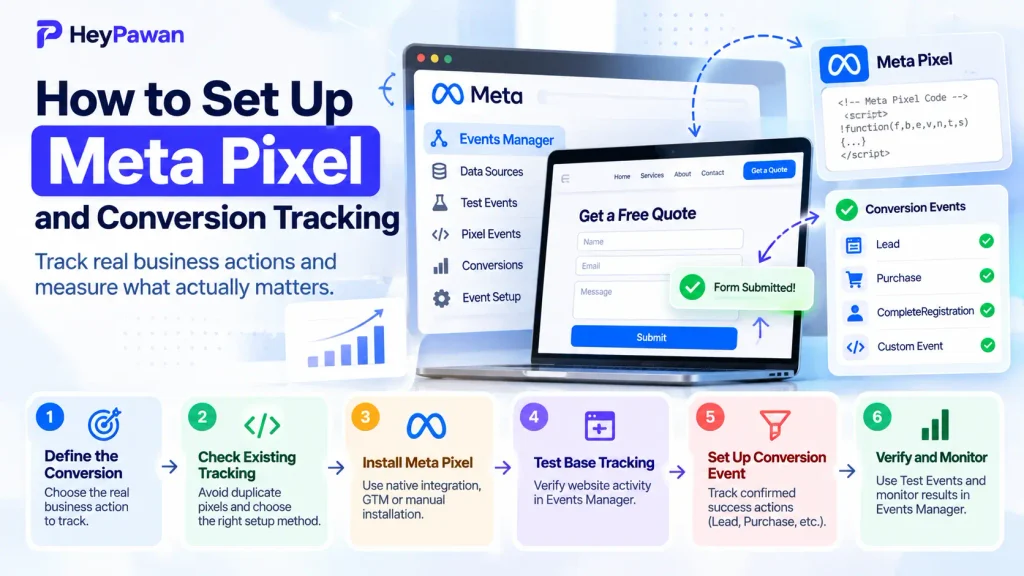
Knowing how to set up Meta Pixel and conversion tracking correctly means doing more than adding tracking code to your website. You need to decide which completed business action matters, connect the right Meta data source, configure that action as an event, and verify that Meta receives it correctly.
For a lead-generation website, that may mean a confirmed form submission as a Lead. For ecommerce, it may mean a completed order as a Purchase. The goal is simple: one genuine business action should create the correct Meta event, while failed or incomplete actions should not.
Before You Set Up Meta Pixel and Conversion Tracking, Define the Conversion
Start with the business outcome, not the tracking code.
Choose the action you actually want Meta to measure, such as a completed contact request, purchase, or registration. Then perform that action on your website and identify what confirms success.
A form may display a success message, redirect to a confirmation page, or generate a website event after submission succeeds. That confirmation is more reliable than tracking the Submit button itself because a visitor can click Submit without completing the form successfully.
A simple conversion map might be:
Completed enquiry → confirmed form success → Lead event
For ecommerce:
Completed order → order confirmation → Purchase event
Defining the outcome first prevents technically functional tracking from measuring the wrong action.
Check Existing Tracking and Choose One Installation Path
Before adding a new Pixel, check whether Meta tracking already exists.
Look in your website platform, current Meta integrations, Google Tag Manager, plugins, theme code, or custom code. Confirm which Meta Pixel or website data source is already connected.
This matters because the same tracking installed through multiple methods can create duplicate or incorrect events. Shopify warns about leaving manually added Pixel code in place when Facebook and Instagram by Meta is already managing the Pixel, while Squarespace documents conflicts between manual or GTM-based Pixel code and its built-in integration.
Choose one primary installation route:
- Native or partner integration: Check this first when your website platform provides a maintained Meta connection. Shopify, Wix, and Squarespace have native Meta integrations.
- Google Tag Manager: This can be suitable when GTM already manages marketing tags and the website provides a reliable conversion signal.
- Manual or developer implementation: This may be needed for a custom website or unsupported platform.
Google Tag Manager is one option, not a requirement for every website. Before changing anything, record the current Pixel ID and where tracking is installed so changes remain reversible.
Install the Meta Pixel and Confirm Base Website Tracking
After choosing the installation route, connect or install the Meta Pixel and verify basic website activity before diagnosing the final conversion.
Current setup flows use Meta Events Manager for website data connections. Exact labels can vary by account, but current interfaces can include options to connect a web data source and select Meta Pixel.
After installation:
- Publish any required website or tag-management changes.
- Open the live website and visit normal pages.
- Open Events Manager and use Test Events to inspect incoming activity.
- Confirm the activity belongs to the intended Pixel or data source.
You can also use Meta Ads Data Advisor, formerly Meta Pixel Helper, as a browser-side diagnostic aid.
At this stage, you are confirming the base connection only. Seeing website activity does not prove that Lead, Purchase, or another conversion is configured correctly.
If nothing appears, check the selected Pixel, whether changes were published, browser extensions or ad blockers used during testing, and consent controls that may affect when tracking loads.
Configure the Conversion Event Around the Real Success State
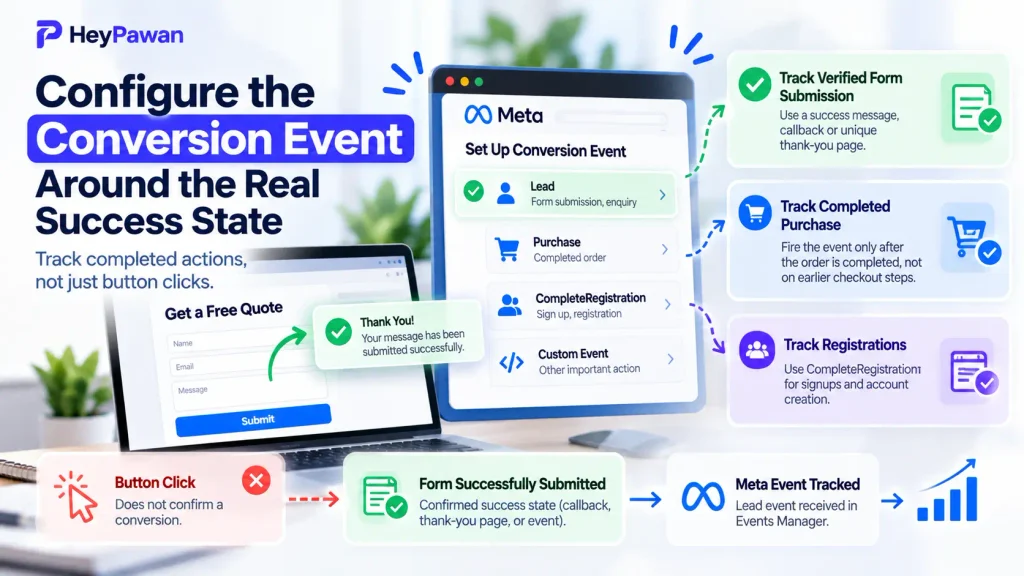
Now map the completed business action to the appropriate Meta event.
If your website platform already maps events through its Meta integration, check what it sends before creating another event manually. Some platforms can send events such as Lead, Purchase, or CompleteRegistration when the relevant action occurs.
For a lead form, use a confirmed completion signal where possible, such as a successful form callback, a post-submission event, or a unique thank-you page that appears only after success. Avoid treating a generic button click as proof that a lead was created.
If you need a deeper walkthrough for identifying reliable form-success signals through Google Tag Manager, see my guide on tracking form submissions in GA4 with Tag Manager. The principle is the same: attempted submission and successful completion are different actions.
For Purchase tracking, make sure the event represents a completed order rather than an earlier checkout step. If the integration supplies transaction details such as value or currency, verify those during testing.
Run the Meta Tracking Acceptance Test
When you set up Meta Pixel and conversion tracking, do not consider the work complete until it passes a controlled test.
Use Events Manager → Test Events, along with Meta Ads Data Advisor or your platform’s diagnostics where useful.
1. Base connection test: Open and navigate the live site. The expected basic browser activity should reach the correct Meta data source.
2. Successful conversion test: Complete the real business action. The intended Lead, Purchase, or other event should appear in Meta.
3. Failed-action test: Attempt the same action without completing it, such as submitting an invalid form. The intended conversion should not fire.
4. Duplicate test: Complete one valid conversion once. You should not see obvious duplicate versions of the same conversion caused by overlapping installations or event logic.
For ecommerce, also inspect relevant transaction parameters when the integration sends them.
Passing these checks confirms more than the presence of Pixel code. It tests both the technical connection and the conversion logic.
Fix Missing, False, or Duplicate Meta Conversions
Troubleshoot the layer that failed instead of reinstalling everything.
If no basic website activity appears, check the Pixel or data source, confirm the installation is published, and inspect the native integration. During testing, also check ad blockers, browser extensions, and consent behavior.
If base activity works but the conversion does not, inspect the success signal, event rule, native event mapping, and whether the test action actually completed. Then check Test Events again.
If the conversion fires even when the action fails, the trigger is probably measuring an attempt rather than completion. Replace a broad click or early form trigger with a genuine success signal.
If one action creates duplicate conversions, look for overlapping installations such as native integration plus manual code, native integration plus GTM, or two tags sending the same event.
Meta’s Conversions API can also send website event data through a server-side or partner-based connection and can work alongside browser-side Pixel tracking. Some platforms configure both through native integrations. When Pixel and Conversions API represent the same real-world conversion, confirm that the implementation handles event deduplication correctly.
After any correction, rerun the four-part acceptance test.
If your Meta Pixel, website forms, Google Tag Manager, ecommerce events, or Pixel and Conversions API setup cannot be validated confidently, I can help audit and configure the tracking as an independent digital marketing professional with 10+ years of experience. Learn more about my PPC and paid advertising services.
Frequently Asked Questions
Is Meta Pixel the same as Facebook Pixel?
Facebook Pixel is the older name still found in many searches and tutorials. The current product terminology is Meta Pixel.
What happened to Meta Pixel Helper?
Meta’s current Chrome extension is Meta Ads Data Advisor, which Meta identifies as formerly Meta Pixel Helper.
What is the difference between Meta Pixel and Conversions API?
Meta Pixel handles browser-side website event collection. Conversions API provides a server-side or partner-based data connection and can work alongside Pixel. Some website platforms configure both through their native Meta integration.
Sources
- Meta Blueprint: Set Up the Meta Pixel and Meta Conversions API for Ad Campaigns
- Meta Blueprint: Optimize Meta Conversions API
- Meta Ads Data Advisor, formerly Meta Pixel Helper
- Shopify Help Center: Meta Pixel
- Wix Help Center: Connecting Meta Pixel and Conversions API
- Squarespace Help Center: Using Meta Pixel with Squarespace
- Framer Help: Adding Meta Pixel to Your Site